

Wednesday, November 28, 2012
Pumpkin Crunch Cake with Candied Cranberries
For Thanksgiving, I baked a delicious cake adapted from this recipe.
My cake looked quite different, the layers more defined, the crunch darker. It was delicious!
To make this cake, just follow the link recipe above.
The only thing I changed was to put a tiny bit of maple syrup in the frosting to give it a more complex flavor.
I didn't want to cover my whole cake in the crunch topping because its a TON of butter (the whole cake has almost 7 sticks), and the cake is so sweet it needs a tartness to balance it out. I decided on cranberries.


How to candy cranberries (or anything really)
In a double boiler, bring 1/2 cup of sugar and a few tablespoons of water to point where the sugar has completely dissolved. It won't be boiling.Add in your cranberries. I didn't measure, but you don't want too many. I probably had a little over 1/2 a cup.
Cook for about 45 minutes, and take off heat.
Let the cranberries sit in the juice overnight, or at least a few hours.
Strain the juices off and put 1/2 cup of sugar onto a plate.
Put your cranberries on the plate with sugar and roll them around.
Tah-dah!

On that note, no cake I have made fits in my portable cake carrier. They need to make those lids taller...
Monday, November 26, 2012
Thanksgiving weekend
We took Griffin on his first over night to my mom's house, aka Babcia. He did pretty excellent in the car considering he didn't sleep, and slept wonderfully at night in his pack and play. His naps were a little off, since I didn't really try to keep him asleep after he would wake up, so he ended up falling asleep at the dinner table during our Thanksgiving meal.
He seemed to enjoy the new environment and was pretty happy, which makes me hopeful for our week long trip/flight coming up before the new year...

He seemed to enjoy the new environment and was pretty happy, which makes me hopeful for our week long trip/flight coming up before the new year...

Monday, November 19, 2012
DIY Baby Tree Ornaments

For the holidays I've always loved those ornaments that have the baby hand or footprint. I decided to make my own, and its so easy, I'm including a tutorial for you all to do it as well!
Materials
-Crayola Model Magic (one pack will make 2-3 ornaments for a baby)

-your choice of 2 craft paints. I chose blue martha stewart, because who can resist her packaging?
-Mod Podge Hard Coat

Steps
1. Press out your model magic to the shape you want, depending on what you are stamping. The right one is for a hand, and the left, a foot. You want to leave it thick enough that you will see the impression. Model magic is super light, so no worries that it will weight down your tree branches. The edges look rough, but in the end you can't really tell.

3. Poke a hole at the top of the ornament for the ribbon.


6. Take a wet paper towel, or wipe and wipe around the indent so that it looks how you want it. I wanted the higher parts to have less paint, and I wanted some of the color around the rest of the piece. Let it dry.


7. Paint your second color into the numbers and letters, or whatever other design you made on your ornament. Do the same technique with the wiping. I chose dark blue. Let it dry at least overnight.


The back.
9. Take a thin piece of ribbon and fold it in half sticking the middle through your hole. Thread the open end through the closed end, and there you have it! All ready to tie on your tree!

Friday, November 16, 2012
Sitting up

Wednesday, November 14, 2012
Santa Hat!
The past couple of weeks I've been crocheting a ton, trying to make gifts for the babies in my life. Usually when I get a new pattern it takes at least one try to get the sizing right, because most patterns are usually off.
I'm on my 2nd attempt at Santa hats, one of which I will be sending off to my niece soon. Just needs a pom pom and some shaping.
Here is the pattern if you are interested. When stretched a bit the white brim just needs to be measured for your child's head circumference (don't follow the pattern). The rest of the pattern works just fine :)
 The pattern for this hat was SO off, calling for 37 stitches across for a 6-12 month old. I ended up with 53 for my niece's head circumference, which means my boy will need a bit more...
The package will have a couple other surprises, that I will hopefully get some photos of!
I've got quite a few other projects, one of which I can share with you all one I begin, and that is a crochet Hobbes. The rest are gifts and will be shared after xmas.
I am glad to say that I am done with my xmas shopping for my little one, and my niece (babies are VERY easy to shop for) and even though I felt like I was being conservative, bought way to many things for their first xmas...
I'm on my 2nd attempt at Santa hats, one of which I will be sending off to my niece soon. Just needs a pom pom and some shaping.
Here is the pattern if you are interested. When stretched a bit the white brim just needs to be measured for your child's head circumference (don't follow the pattern). The rest of the pattern works just fine :)

The package will have a couple other surprises, that I will hopefully get some photos of!
I've got quite a few other projects, one of which I can share with you all one I begin, and that is a crochet Hobbes. The rest are gifts and will be shared after xmas.
I am glad to say that I am done with my xmas shopping for my little one, and my niece (babies are VERY easy to shop for) and even though I felt like I was being conservative, bought way to many things for their first xmas...
Friday, November 9, 2012
My petite popover
When I saw this, I knew I had to have it. I'm ok at knitting, but I've only ever knitted in a straight line, and there was no way I could attempt this. I just didn't have the time.
Luckily, I have a friend that is wonderful at knitting, and she agreed to make this for me!

I picked out the yarn and sent it to her, and she knit it. Its going to be perfect for the winter under his sweaters for that extra layer of warmth in the chest! It fits my huge baby perfectly! (Its a 12-18 month pattern)...
Luckily, I have a friend that is wonderful at knitting, and she agreed to make this for me!

Thursday, November 8, 2012

Wednesday, November 7, 2012
Yummy Roasted Tomato Soup Recipe
You will need:
Soup pot
10 tomatoes
olive oil
4-6 cloves garlic
1 onion
tsp fresh oregano
tbsp fresh basil
2 cups veggie stock
salt and pepper
1/3 cup cream
steps

you will slice your tomatoes
place face up on a pan
place cloves of garlic there with the tomatoes
drizzle with olive oil, salt, and pepper.
Bake in oven at 375 for 1 hour.
Afterwards, you can let it cool, or use right away. I roasted in the AM for soup in the PM.
Place tomatoes and garlic with all the juices from the pan in soup pot over med/high heat.
Chop your onions and add them to the pot.
Add your herbs. I have these two growing in my garden, consequently, so they are easy to get! Just hop out the back (or front) door.
After you feel like the ingredients are to your liking, add your stock and bring to a boil.
Add salt and pepper to taste. I don't think I added any, and it didn't need it really. I always forget this step...
After the pot has been boiling for at least 20 minutes, immersion blend your soup. You can strain it, but why? Thick soup is yummy!
10 minutes before serving add you cream and mix well.
Its ready!

You can add a little sprig of basil on the top for decoration. This went really well with the bread i posted about yesterday!
The original recipe calls for chicken stock, but we are vegetarian, so I substituted an olive oil/veggie stock. It also calls for butter, but per my husbands request I omit butter from almost all recipes...
ENJOY! This soup is so yummy and perfect on a cool fall or winter day.
This soup serves 4, as a appetizer serving. You can increase the recipe accordingly.
adapted from this recipe
Tuesday, November 6, 2012
40 cent bread
An easy bread recipe for any meal
Ingredients
3 cups of warm water
1 1/2 tbsp instant yeast (2 packets)
1 1/2 tbsp kosher salt
6 1/2 cups flour
Directions
Add the yeast and salt to the warm water and let it sit for about 5 minutes.
Add flour and let it rise for 2 hours or more, covered, but not airtight.
Here is mine after it had risen.

At this point, you can refrigerate for 3 hours, overnight, or not at all. If you cool it, it will be easier to make a loaf. I made mine the night before I needed it, and it was ready for me when I wanted to bake it for dinner.

Let it rise for at least 25-30 minutes or more.


I like this bread because its easy and takes no effort. You can add whatever you like to make the bread your own, and who doesn't like homemade bread. Always impressive when you are hosting a dinner!
adapted from this recipe.
Monday, November 5, 2012
Pumpkin Cupcakes with Maple Cream Cheese Frosting
For my fall dinner I made these pumpkin cupcakes that I adapted from this recipe. The frosting was from this recipe. They turned out awesome. I think the best cupcakes I ever made. Not too sweet, a little crunch. Perfect.

You need -
1 cup flour
1tsp baking poweder
1/2 tsp baking soda
1/4 tsp salt
1 tsp cinnamon
1/2 teaspoon ground ginger (I used fresh)
1/2 tsp pumpkin pie spice (original recipe asks for allspice)
1/4 tsp nutmeg
1 cup pumpkin puree
1 cup sugar
1/2 cup vegetable oil (I always use olive oil...)
2 large eggs
1tsp. vanilla extract (always use the real stuff)
1/2 cup chopped pecans
Steps

PREHEAT TO 350 degrees
1. Mix flour, baking powder, baking soda, salt, and spices
2. Add in pumpkin, sugar, oil, eggs, and vanilla.
A lot of time people will mix dry and wet separately, then combine later. I don't really want to dirty TWO bowl (lazy), and it always works out just fine for me.
3. Stir in pecans. I crushed mine even smaller in the blender before adding.
4. Scoop into lined cupcake pan about 3/4 full.

Bake for 22 minutes. Let them cool for a bit, take them out of the pan, then cool them completely.
FOR THE FROSTING
1 stick of col unsalted butter
1 8oz pack of cream cheese
4 cups powdered sugar
2 tbsp of REAL maple syrup
1 tsp vanilla
1 tbsp of cold heavy cream
Mix it all together. I used my stand mixer with the whisk attachment. Worked wonderfully.
The frosting can be put on the cupcakes any way you like. I used a pastry bag.
Finally, top with whatever fall decorations you like.
Here are mine.


Thursday, November 1, 2012

Caramel Apples

First, gather your ingredients.
I used 6 apples, but you can make as many as you like.
You will need parchment paper, or a silicone baking mat (the best thing ever, get one if you don't have one)
Caramel Apple sticks. I bought mine in a restaurant supply store, but I'm sure they are available online. What isn't?
Toppings.
I used: sprinkles, chopped nuts, toffee pieces, mini chocolate chips, cocoa nibs, and white chocolate. The possibilities are endless.
For 6 apples I used one pack of Kraft Caramel Bits

I don't know why this bag says it comes with sticks. Mine didn't. Awesome if yours does, then you don't need to buy them separately.

While this is happening, wash and scrub your apples.
Once your caramel is melted, I suggest getting your toppings ready in little bowls if you want to dip them. You can dip or sprinkle.
Turn the boiler off, let it cool for a minute or so.
The next part is quick and messy, so no photos.
You dip your apple in the caramel, and using a spoon, you can help the caramel up on the sides. Once it is done, you can dip or sprinkle your toppings, and place the apple on the baking mat. Caramel will drip everywhere.
You want to do all your apples fairly quickly so you can get the in the fridge. You can see that I took my sweet time and the caramel was sliding off the apples.

Once those cooled for an hour or so, I melted white chocolate in the double boiler and drizzled it on some of the apples. If you want to do this, follow the same rules as the caramel. A tiny bit of water for 1 pack.

I also did some milk chocolate after.
The final product.

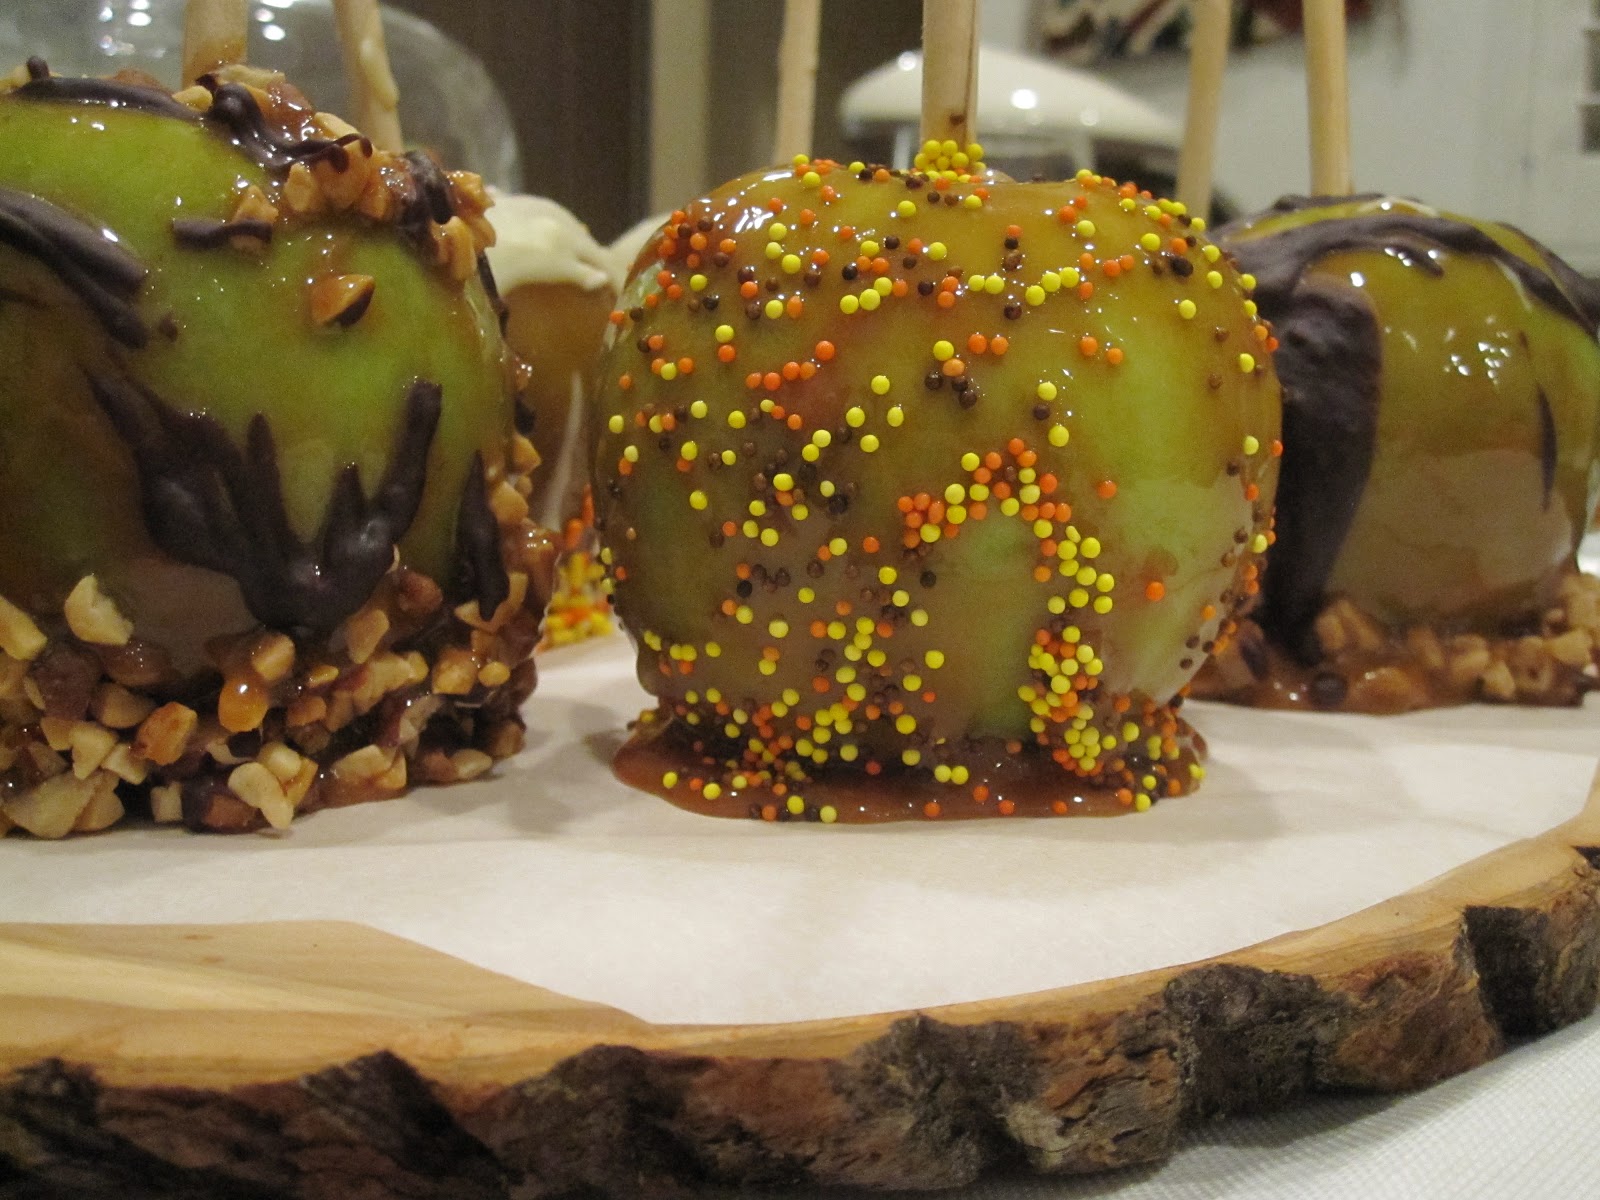

Overall, a messy but worthwhile project! Your fall guests will appreciate the gourmet-ness of your apples. Who doesn't LOVE caramel apples???
Subscribe to:
Posts (Atom)